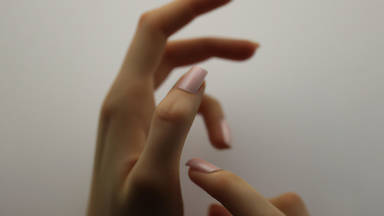
Baby boomer nails are among the most popular nail designs. These white and pink ombre nails are simply stunning. If you want to mix a modern style with a timeless notion, look no further than Baby Boomer nails.
To start the design, we will need a dry manicure, otherwise known as a Russian manicure. This can be accomplished with a thin scrub tip, which is essential for our purpose, and you will be able to perform a perfect manicure with it. During your manicure, push the cuticles back to give yourself more room to apply your material to the nail.
Use a bigger scrub to perform the rest of the process.
Next, we need to select the right tip to attach to the nail, and we will do that by taking into account the size of the nail. When choosing the tip, you should pay attention to the hollow point behind it. The larger the hollow point, the better. This will ensure that the tip can be attached properly to the nail surface.
The nail should be attached to the surface of the nail with enough glue applied to the hollow point behind the tip. The point should be level with the tip, and the nail should not be elevated or pushed down. Let the glue harden for about five to ten seconds and check that there are no bubbles under the nail tip. Once the tip has been attached firmly, we can begin working on its surface in order to prepare it for applying the material.
Now, we should scratch the surface of the tip with an electric scrubber to remove any shine. After we remove the shine from the nail surface, we can use a nail cutter to create the desired size of the nail. To prevent damage to the tip, ensure that the cutter is exactly aligned with the tip, and that it is neither lower nor higher than the tip.
It is necessary to shape the nail roughly to the shape and angle we have in mind for the design before we can begin to apply the material. It's important to note that the tip of the nail plays an important role in the final design of the nail, in some ways acting as the blueprint for the final design. Consequently, you should try to shape the tip according to the design you are trying to achieve as much as possible.
In most cases, an inverted V shape works best. At this point, we don't have to shape the tip completely. We just need a rough idea of what it should look like, and then we can scrub it until it looks how we need it to.
In order to remove oil from the nail surface, you need to apply a dehydration fluid and anti-fungal solution to the nail tip after it has been scrubbed. Allow it to dry for a few seconds after applying it to the nail.
In the next step, you will need to use a primer. There are two types of primer, an acidic type and a non-acidic type, so you will have to select a primer based on the type of nail you are working on and the type of material you intend to use.
After dipping Your brush in the liquid, remove the excess with the side of the bowl. Dip the brush in the powder once it is a little wet, allow some of the powder to adhere to the brush tip, and apply the material to the tip of the nail and move upward from there.
Applying the material to the middle of your nails is as simple as dipping a brush in the material again and picking up some colored liquid powder. Tap your brush against the nail to shape it. It is imperative that you apply pressure evenly to the nail in order to distribute the material evenly across it. The brush should be used to tap the nail constantly and rarely be moved directly across the nail.
After applying the nail material across the nail to form your baby boomer nail design, let's scrub it to make it even more beautiful. Stay with us while we walk you through the steps.
Let's start by removing the excess material from the nail borders and then scrub the nail very gently, being careful not to scratch the material too deeply.
In order to get an even nail's surface, you should always use the scrub in a straight line, going from one side to another with equal pressure. You should never leave the nail's surface with differing levels of elevation.
Keep your scrub aligned with the free side of the nail while you move it back and forth over the nail. You should not apply any pressure on the upper portions of the nail. A good way for those of you who are new to nail design is to keep track of how many passes you make on each side so that both sides are scrubbed equally.
Scrub the surface with the electric scrub some more. When you reach the cuticles, pull the cuticle back with your other thumb in order to prevent the scrub from touching the tissue and causing injury.
Once the scrubbing process is complete, brush off any debris and then use a cleanser to remove any remaining residue so that the nail surface is clean and free of debris.
You can then apply a thin layer of top shine. To do so, pick up enough of the material with the brush, place it on the top one-third of the nail, touch that point for a few seconds, and then work your way down towards the tip. You should also apply the top shine to the tip of the nail since this will help protect the nail and make your nail art more durable. Once the nail has been polished, you need to put it under a LED light for sixty seconds.
Using decorative material, such as jewels, in your nail design will make your design even more beautiful. The jewels can easily be picked up using a special pencil that has wax in it, like what's in candles. This will make your work easier as you will be able to position the jewels on the nail much quicker.
Immediately following the attachment of the jewels, you should place the nail under LED light for another sixty seconds to fix the jewels in place. The hand can then be removed from the LED light and then the nail should be treated with cuticle oil.
Cuticle oils come in different types with different essences and can be used to reduce and prevent inflammation on tissue surrounding the nail as well as to prevent irritation.