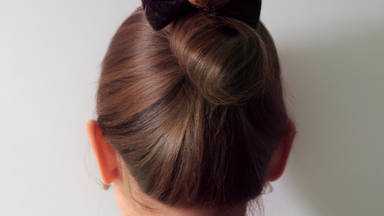
In this tutorial, we will provide you with a new chignon technique. We have for you a curly low-bun chignon that's suitable for brides and who are very conscious of their beauty. There are many questions about how to divide wavy chignon hair. And you might be wondering how to get the hair bunches to go through each other. In this article, you will find all of the answers you need.
Initially dividing involves separating the hair from one ear to the other ear. This is the first division. Also, split the back hair into two parts. Clip up the bottom part of the hair, leaving the upper part alone. Make sure the bottom part is tightly clipped. You cannot work with the hair properly if you use a grip, as it will hold the hair all together in one place. Instead, you should use a pin in order to make a flat layer of hair that can be worked on. We don't need to work on this part yet, just tighten the hairpins.
Once the hairpins are in place, we'll begin placing a prosthesis in the top part of the head. After attaching the prosthesis to the head, twist the hair around it and tighten it.
To make the hair puffy on the back, we need this layer of hair. Now, tie the free end of the hair with a pin on top of the prosthesis. You are done with the bottom of the head.
Starting now, the primary part of your chignon work begins. Your waves will sit on the prosthesis. Try to create hair stripes where you will create waves. Hold the layer in place with two hairpins on each side. Pull out three to five small bunches of hair to make the surface lines. Apply the spray, shape the hair, and hold the bunches of hair in place with pins and hairspray.
You should keep the lines apart so that they are more noticeable. Do not put them too close together. It is recommended that you attach the lines to the prosthesis beneath the head in order to prevent them from collapsing. As an alternative, the lines can be attached to the prosthesis in pairs.
The most common way to do this chignon is to complete the bottom, then continue on to the front. Decide which parting on the front to make, but it usually looks prettier if you divide it diagonally. It looks much better on this particular chignon style.
Let's divide the diagonal parting in the front and while we're at it, let's also create a stunning updo. an up-do which is neither too simple nor too complicated.
After you brush thoroughly, divide a bunch of hair diagonally while keeping the parting diagonal. Take a section of hair and brush it thoroughly before applying the hair cream.
Use some hair cream. Make several stripes by pulling the hair backwards while you apply the product. Using a hairpin, you can hold each stripe in place. You can make as many stripes as you want.
Next, separate another bunch of hair from the front. Brush well, and apply some hair cream. When the hair is completely smooth, shape it and pull it so it covers the face a little and attach it to the previous pin, covering it with this layer.
In the next bunch, we will proceed as before, but if you feel the hair is too thick here, you can split it in 2 parts, otherwise, take it as one whole bunch. Once you have brushed it, apply some cream and brush it again. Pull the hair enough so that it is held tightly behind the previous layer. Then apply some spray on your hair to smooth out the frizzes.
You should now take the next bunch of hair that you left aside at the beginning, and use it to both cover the prosthesis and make waves. It should be made wider diagonally, shaped to cover the prosthesis thoroughly, and with a wavy pattern.
Begin by making waves in the front. Smooth the frizz out of the hair. Again, pick up a flat bunch of hair. Pull it outwards a bit and try to make it into shape. Clip it up with a pin. Remember to place it at the right location before spraying.
The reason why many artists find their hair frizzy is that they try to change the hair position after spraying. This results in a dirty chignon as well.
Having fixed the position, you can now spray. In order to prevent the hair from becoming too sticky and to preserve its natural form, apply only a small amount of spray. If there are hairs left from the bunch, and they're too short to use, hide them under the rest of the hair.
When you're done with the bottom part, pin it up, but before you do, separate and brush a section from the layer underneath. Use it to make waves, and then pass it over the previous section of waves and spray it. You will need to continue pulling the hair out and making waves until you complete this chignon style.
The main goal here was to teach the correct way to divide the hair to create a wavy chignon. You can adjust the number of waves on the chignon based on the thickness of the hair using the described technique. When your hair is thinner, the waves will be fewer. Hair extensions can easily be used to achieve this chignon style if the hair is too thin.
Thanks for reading this article. I hope it helped you creating your desired chignon style.