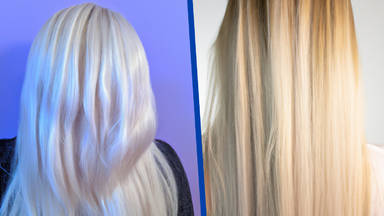
Your hair will continue to grow naturally after you bleach it, resulting in a few centimeters of hair without bleach after one or two months. Since your hair roots are virgin, bleaching them will be easier. Not only will they lighten more easily, but it will also only take one bleaching process, whereas previously dyed hair is incredibly difficult to bleach. The purpose of this article is to share some tips and tricks for bleaching your hair roots more effectively and easily.
When it comes to root bleaching, it is important to remember that the scalp and skin of the person should be oily. Natural oil on the hair and scalp is very important, as opposed to artificially adding oil to the hair with creams.
Next, it is important to separate the hair. rather, split the hair at the top, put it on the sides, and separate it at the back, as well. You should start separating the hair at the front when the hair has grown quite long for quite some time and has a few centimeters of root, and the remainder of the hair has been bleached.
Another point to consider is if a person doesn't have at least five centimeters of newly grown hair from the roots and the rest of the hair has been bleached to a light color, it's best to skip the root bleach for a while. In general, it's preferable to let the hair grow to around five centimeters or more, but if the person's hair isn't bleached very light, it's okay to do a root bleach and the risk is low.
For root bleaching, foam wraps are usually used. Cotton pieces are also sometimes used between the layers of hair. One more aspect that can cause problems is the possibility that a new bleach process on the roots may run down on the hair layer and cut some of the previously bleached hair. This is more likely to happen if the hair has been bleached excessively. To prevent this problem, you may use foam wraps.
Foam wraps take up much less space on the head. Foil wraps take up much more space, and if you want to wrap all the hair layers inside foil wraps, you are going to have trouble controlling it, whereas this same process is much easier with foam wraps. The layer of hair that should be separated should be very thin. This process is very delicate and should be handled with care.
It is now time to prepare your decoloring powder.
Using a bleaching material that is pasty, not diluted, will prevent the decolorizing material from leakage and cutting the roots.
Put some bleaching material under the hair layer, and then wrap the material with foam wrap. Whenever there is considerable space between the roots and the previously bleached hair, apply the material slightly away from the roots and continue toward the stem and proceed down the hair to the stem where the hair has been bleached previously.
You can apply the material even closer to the root if the root isn't that long and the area to be bleached is small. Once you reach the bleached hair, tap the layer with the brush and fade the material close to the border. It is important to know that if you fix this line later, the material will not bleach the hair, so you will end up with dark lines all around the hair layer.
Let's move on to the next hair layer. You need to separate a thin delicate layer so the hair can be bleached properly. Apply some of the bleaching material close to the roots of the hair by holding the hair in your hand.
Although the material is safe for the hair, be careful, as the bleaching product may cause skin damage if it is directly applied to the roots of the hair at the start of the process. Even if the skin is oily, the irritation may cause discomfort to the point where you might be unable to wait for the bleaching process to be complete.
The material should be applied to the hair, then brushed down to the previously bleached border. This is the critical part in the process, and you can achieve the best result only by brushing the hair until the material fades as you approach the border. Otherwise, the material will get to the bleached hair, the bleach will begin working on the other parts much faster than on the hair roots, and it will ultimately cut the hair before it has bleached the root thoroughly. This holds true even if you have used a repair and protection product like Olaplex hair perfector on your hair.
The process of bleaching the root is a sensitive one. Make sure you cover every part of the root with the material and that none of the areas are left dry. Continue on to the next layer after you have placed another foam wrap on this layer of hair. The rest of the hair layers should be done in the same manner and then you can work on the back of the head.
Start at the bottom of the back and work your way towards the top of it. The first thing I recommend to those who have not done this before is to move to the top directly after finishing the right side.
The use of foam wraps can help you bleach the hair successfully and with adequate time without the need to use powerful materials.
As soon as you have wrapped all of the layers within the foam wrap and reached the desired bleach level, apply the material to the roots as well. Apply the material to the roots using your brush.
The foam layer should be unwrapped before you apply the material to the roots, the hair stem should be pulled gently, and once the bleach level reached the level you want, you should apply some product to the roots and continue with all the other layers afterwards.
Continue by reattaching the foam wraps, waiting for the roots to bleach, then removing the foam wraps again, and rinsing the hair. If you want to apply Olaplex Hair Perfector, or any other protective product, you can do this now, and then the hair is ready to dye.
The bleaching process of your hair has now been completed. You can always find more details about hair color and dye techniques in our other tutorials. So, don't forget to check them out as well.