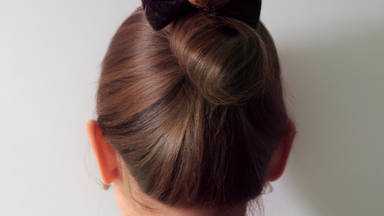
In this article, I will try to explain the different methods of designing chignon styles. The chignon is a classic hairstyle which is derived from the French phrase, "chignon du cou", which means 'nape of the neck'.
There is something truly captivating about a chic, sophisticated roll; whether it is a sleek, contemporary look or a retro-style, you're sure to find something outstanding! The process of creating a chignon is easy and straightforward. It works best on freshly washed hair.
Lets start
To begin, we should divide the hair into two parts from the middle, so we should start somewhere above the ears. Split the hair into two sections from here and then brush each part of the hair thoroughly.
The hair should be tied in the middle of the head. This means you should locate the line dividing the head into two parts between the ears and the hairline behind the head. It is okay to use prosthetic hair if the hair is too short, but it is better to use natural hair if the hair is long enough.
Teasing the hair for a hair prosthetic is different from teasing it for other purposes. When creating a hair prosthetic, you tease the hair to create more volume. This can be accomplished by brushing hair from the root to the end of the layer, which will add volume and form a firm prosthetic. Using a styling spray while you work will help you separate the thin layers of hair.
Styling spray should be sprayed liberally on the hair, and a hairnet should be secured with a hairpin to the bottom of the layer. The back hair should be placed into a hairnet and secured with hairpins to be used as a prosthetic.
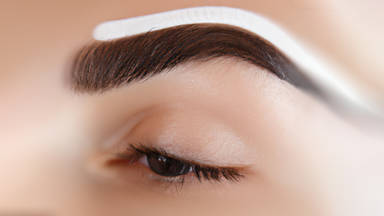
Now you can move on to the top of the head. We need to separate the hair coming from the two arches of the eyebrows, from the rectangular layer of hair at the front of the head. We have to start at this point and work our way back.
Therefore, you should separate the layer in the front starting at the side of your eyebrows and reaching all the way to the back of the head with a hairpin. Repeat the process on the other side of your face. Separate the hair from the side of your eyebrows all the way to the back of your head. Put a hairpin in place to hold the hair layer in place.
The separation of the layers of hair on both sides of the head must be clear to see. We have divided the hair into three sections: the front section of hair on top of the head, the prosthetic on the back, and the two layers of hair on each side of the head.
We can now begin to tease the hair layers. Take a thin layer from the top, brush it upward, and then tease it a few centimeters from the root. We will apply some styling spray to it before we separate the next layer and tease it some more.
To style your chignon, you should brush the hair layer first and then tease it. Holding the whole layer in our hand and using sticks to hold it will help us to do so. You can now brush the hair with the carbon brush while holding the hair layer between your thumb and two fingers. The lines you create on the hair should look neat and in order.
In order to make lines on the hair, hold the top of the layer with your fingers and apply styling spray to the rest of the layer while you order it downward with the other hand. Pull the hair up with your fingertips before applying the styling spray. Working on the roots first will allow you to hold the hair up. How high you pull this line of hair up depends on the chignon style and the person's preferences.
It's all about how neat and bold these lines are. Use hairpins to hold the hair and apply styling spray when you want to style the lines. You don't need to curl it at all when you want to style the lines.
You can also apply styling spray after each step. Another technique is to go through the same process, but at the end you apply a little heat with a hair iron and it is virtually the same as using a hair dryer. We should tease the rest of the layer and continue toward the prosthetic. Install the hair layers using hairpins and don't touch the line we created too much.
Next, we will work on the front. You can do the split section in zigzag formation or in a straight line, depending on your preference. First, we will tease the hair diagonally. Then, we will tease it again close to the roots. When you work with synthetic hair, it's difficult to tease it properly, but if you apply this technique to natural hair, then the hair can be teased pretty effectively.
Hold the rectangle layer of hair in your right hand, pull the hair back a little, and brush the hair. This way we ensure there will be no frizz when we are creating our lines on the hair. Twirl the rectangle layer in your right hand.
Once you have the twisted hair in your hand, fix it with a hairpin. Then take the layer on the side, hold it in your hand and twist it in the same direction as the layer you just twisted on top.
Creating the lines in the front is the next step. You can make the lines with any distance between them. After creating the lines in the front, we can fix them and separate the hair from the back to form a knot.
When brushing the hair layer, hold it with your hand from the base so as not to pull down the rest of the hair and ruin the design. You can use styling spray to fix frizzy hair if you notice any.
You should smooth the layer with your brush, covering the hair by creating deep lines that complement the ones you made in the front. This is the layer that will be used for the knot.
After that, you should put a hair clip at the top of the layer and tease it a little from below to make the layer appear thinner. Then, apply hair spray layer by layer. Give yourself time to work on the hair layer so you can get the thin layer you need.
You can apply more styling spray if necessary after the first layer is dry. If you have a hair iron with a moderate temperature, you can work on the hair layer to make it thin and dry. Once you remove the hair clip, twist the hair gently and hold it with a hairpin. The lines you created on the hair will be on the remainder of the layer.
Next, tease the hair at the root. Hold the hair toward the crown, brush the hair upward, and twist it in this way. Hold it in place with a hairpin and begin creating lines on the layer. You can form as many lines as you desire on the hair. Since with the chignon you style most of the hair towards the back of the head, it is typically recommended that a few lines hang on the sides of the face.
By using your hands, you can draw the lines in any way you like. Use a hairpin to fix the layer, then brush the rest of the hair. Separate a portion of the hair and knot it. Brush the remaining portion, widen it, and place it on the side of the prosthetic that is still visible. Create lines on the remaining hair layer underneath the prosthetic.You can repeat the same process as you did for the other side. Apply styling spray and begin thinning this layer. Continue with the step-by-step application of styling spray as you did on the other part. Straighten it, apply styling spray and begin making the layer thin.
Once again, spray your hair with styling spray and gently massage it with your fingers. You can even blow on it to make it dry quicker. After you have completed this step, dry the layer a little with a hair iron, remove the hairclip, and twist the hair as you had done on the opposite side.
Having finished styling this chignon, I hope you enjoyed reading this article. Be sure to read our other articles for more information on these and many other chignons.