There are a lot of people who are too busy to go to a beauty salon and would like to learn how to dye their own hair at home. When it comes to dyeing your hair at home, it can be hard to know how to get it right with so many different products, shades, and techniques available. The following is a step-by-step tutorial for at-home hair dyeing for people with problems rendering a uniform color or covering white hair patches.
In order to dye hair correctly, you should first divide the hair into two centimeter-wide batches, starting from the back. Afterwards, you need to mix your formula, which is a mix of coloring products and oxidant agents. For optimal results, you should carefully choose the dye product and color spectrum you use.
You should focus your efforts on the stem rather than the roots of each hair strand. This is because the roots are newer, more delicate, thinner and warmer and hence, the dye formula will affect hair strands more quickly at the root.
If the dyeing products' packages state 1+1/5, that means one and a half times as much oxidant is needed for each tube. You can calculate the amount of oxidant you need using the same measurements if you aren't going to use the entire tube. Use the indicators on the tube's side to determine how much product you are using. Measure each mix carefully so you get the correct amount of each product.
High-quality dyeing products come out of tubes without any air bubbles inside, and the amount inside must be exactly as indicated on the package. In contrast, a low quality dye product may come as a tube that is only partially full.
Once one-fourth of the product has been poured into the dish, you will be able to measure the exact weight. You need to add one 1.5 times as much oxidant as dyeing product. The dyeing product should be blended before adding the oxidant agent.
Next, use the palm of your hand to grab a batch of hair and apply the mix onto it. Holding your hair this way will prevent the product from coming in contact with the roots of your hair. Otherwise, some hair will be exposed to product for a longer period of time than necessary and there is also a possibility that the mix will touch the batches under the one you're working on.
After applying the mix to the hair batch, massage it thoroughly to ensure that it is fully covered in dye. Repeat the process for the mirroring batch as well. You should not apply the product any closer than two centimeters to the root of the hair strands. When the hair batches are thinner, covering them with the product is easier.
Continuing on to the next layer to separate the hair, if it's hard to cover the hair using only one clamp, use two clamps to cover the hair. Massage the hair layer by layer, starting from the bottom and moving up.
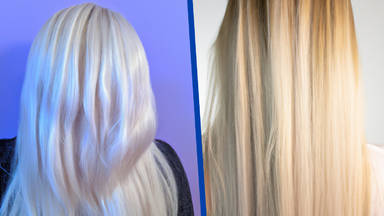
You don't have to be an expert to change your hair color to a darker shade, but to go lighter, you'll need to learn a few tricks. The hair roots underneath need to be covered with your hand, otherwise, the dye will appear lighter on the roots. People who plan to lighten their hair should pay particular attention to this. If you put the dyeing material all at once, you will also get the product on the roots, resulting in a mix of colors.
After coloring the back of the head, move on to the right side. A general rule of thumb is the left side of the head has more heat, and dyeing results come out faster due to the left-leaning position of the heart. As soon as you finish covering the right side, you can move onto the left side and complete the procedure.
In determining how effective the dyeing product must be, it's important to take into account the percentage of white strands in the hair. If there are a lot of white strands, the dyeing product's cover power will have to be stronger.
As soon as the applied product has taken effect, you may cover the roots. Make sure the batches of hair don't stick together when applying the product. When you have to separate the batch again to cover the roots, this makes your job easier. Each batch of hair should be pulled up and dyed from the roots up, then you can pull the batch down and do the same on the opposite side of the head. Let the product set for a few minutes.
Hair must be rinsed in the sink when both the root and stem are colored thoroughly. A good conditioner will improve the dye and give you silky, soft hair. Furthermore, a conditioner will fix the dye on the hair by helping close the cuticles, which are the outer layers of the hair shaft. The elegance and lushness of your hair can also be preserved by using a vitamin cream.
In order to conceal a few centimeters of white hair strands and root growth with a dye, you need to consider the type of hair and how much white hair you want to cover.
The best way to cover white hair is to begin at the front and work your way backwards. You can start with a weaker oxidant, like oxidant volume 1 and work your way downwards.
It is not uncommon for people to have white hair only on the front of their heads. When this is the case, it is possible to make two different mixes that can be used simultaneously. The front of the hair that has white hair strands should be treated with an oxidant volume 1, and the rest of the hair can receive an oxidant volume 2. You could, for instance, use a level 5 gold plus chocolate dye with oxidant volume 1 on the front, and the exact same dye combination together with an oxidant volume 2 for the rest of your hair.
Waiting a bit longer for the product to work is recommended in cases where there is a lot of white hair to be covered. Moreover, you should always use an oxidant according to the manufacturer's instructions. Having a good deal of precision about mixing your formula is also important if you want a dye to match the samples provided in the catalog.