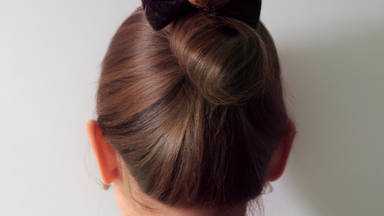
In this article we will show you how to do a combined chignon, which is a mixed style of a weave and linear chignon.
As a first step, Let's start by separating the hair on the head. Pick a wide length of hair here to spread the hair from one ear to another. Ideally, it should be the same length on both sides. It should be shaped like a line with a little diagonal part at the end. It's a good idea to separate a bit more hair at this point to help the aesthetics of the work.
Next, tease hair on top a little bit. Hold the hair and separate a section equal to the one below it. Separate the hair diagonally, as in the previous part. We're going to use this part as our foundation for our chignon. By teasing this section, we will add some volume and avoid it looking flat. This part will be put away for now.
To hold the hair, you can use anything. A hair band works well for this. I recommend using the hair band at the bottom so the base can be formed there. You can even use two hairbands to ensure it will stay in place.
Then, add a hair prosthetic with the same color as the hair itself. Connect it to the hair with pins.
Create a curve in the part hanging from under the prosthetic and add a few lines to this part of the hair. Make sure the lines are not too deep, since this is the basis for our chignon. You can curl up the braided end after you have created the lines to make the chignon look better. However, you can still do the chignon without this effect.
The part on top of the head
We have already created the base for our chignon, however, as I mentioned before, you should tease your hair a little bit so your hair won't look completely flat. Here you need to brush the hair gently first. Curl the hair with your fingers by holding it in your hand and finally keep the hair in place by using a hairpin.
Apply a hair styling spray and create the lines, but avoid flattening the hair. Use the lower layers of your hair to add volume here.I n order to add the lines, you should leave the surface intact. Otherwise, it could get frizzy and make the work harder.
Similarly, for the split, you need to hold the hair in your hand and curve it. It's OK to apply a little cream to prevent it from getting frizzy. You don't need to apply any other products because the hair needs to keep its shape and style.
Hold your hand in place and fix the hair with a hairclip. You can add lines after the hair has been fixed with a hair pin. A little hair spray is also helpful. Don't remove the hairclip until the end of the chignon.
Let's now work on the rest of the hair section. Since it's connected to the other batch of hair, we need to touch it up very gently. Brush the hair after adding a bit of cream. Repeat the same procedure used in the previous step.
Once the pins are in place, you can use a clipper to hold the hair. But you need to be careful not to ruin the chignon. Move slowly and from above. Use a little spray to help fix the hair. Make sure to apply it from a distance.
Off to the next part.
We will continue to work on the hair on the side. This is the part where I told you to separate a little hair to work with for the aesthetics. The more hair we have to work with, the better the final result will be. The more lines you add here, the better the chignon will look.
Be gentle while brushing and curving the hair. Use hairpins to fix the hair. Don't move your hand yet. Clip your hair and spray it with hair spray. Once the pins are taken out, these lines will become visible. We're now going to move on to the next part.
Separate a part of the hair, brush it gently, and slowly curly it. This part of the hair should be straight and then clipped at the bottom to create the lines. As the hair has not yet been fixed, extra care must be taken. If necessary, spray some hair spray on. This part of the hair on the top should have the same size lines. You can extend the same lines to the bottom part of the hair.
The part adjacent to the ear
You must first brush this area and apply a little hair cream. Try to make the lines as you curl the hair and attach the hair pins slowly so as not to damage the chignon base. You may also apply a little spray to the hair.
Add the pins once you have styled and curled the hair around the ears on both sides, because if you don't, the hair may fall and ruin the chignon. These pins are temporary and will be removed at the end. Let’s use a little hair spray. Let’s style and clean our lines.
We'll proceed to the end of the hair. Curve it in the same way as before. If you use the fixator and cream properly, the lines will appear by themselves and you won't have any challenges.
Here is the final step of the chignon.
Last but not least, let's work on the left side of the head. Separate one part of the hair with your finger. Don't separate it in a straight line; instead, separate it diagonally. While brushing the hair gently and straightening it, apply some hair cream and open it in your hand. Add the pins as you curl the hair. Try to make the pins a little deeper as we still have work to do on this part.
You can add more pins if necessary. Spray a little styling spray on to make the pins stand out. Bring it close to the top of hair and spray with a little styling spray. This part of the hair needs to be attached to the prosthetic hair.
The rest of the hair should be separated into two sections and curled the same as before. Attach them on top of the previous layers after you curve them.
This step concludes the mixed chignon tutorial. Make sure to check out our other articles for more information on chignons, as well as other hair and skin care tips.