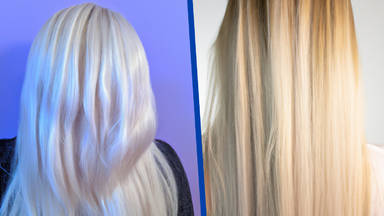
This article explores how to create ombre highlights using one of the most recent techniques. Today, people can do most of their own hair dyeing and highlighting independently. Covering gray roots or providing an even color all over with at-home hair color is a great option - and, maybe even simple, if you have the right tools. However, The application of ombre highlights may look simple, but it can be complicated. With no foils or guides, it requires skill to understand placement. Furthermore, it is challenging to create flawlessly blended highlights on your own, particularly when it comes to the back of the head. This article will teach you how to do this in a way that will make your hair stand out uniquely.
In recent years, new techniques for highlighting have been introduced to the market. These techniques include Ombre, Sombre, pixelating, panting, and more. You can use a wide variety of tools and techniques for an Ombre highlight. The way you probably have seen ombre highlights done is by laying your head on a flat surface, spreading your hair, and then applying the highlight. Today we'll show you a new and more effective way of applying ombre highlights.
Let's begin
Separate your hair, keeping the majority of it on top, the rest hanging down.When using the brush tip, measure the distance from the separation line to the ear on both sides to ensure that the hair is separated directly and symmetrically on both sides.
Having separated the hair correctly, the rest of the hair can be pulled up and held in place with hair clips, and a new tool called hair disk, (as it resembles a disk) can be used on top of the head.
The disk's elastic part can be positioned on top of the person's head in different sizes. Place the disk on top of the head and pull it down until it lines up with the forehead. Pull the hair from the top of the disk, then put it on top of the disk. Then you can place each layer on a line around the disk, holding it in place using hair clips. The material can be applied to the parts of the hair that hang from the sides of the disk.
Mix the material in the bowl, and using the palette, apply it to the hair. The material you mixed should now be applied to the hair layer using the brush and the palette. In general, the higher the density of the material you use, the less you have to worry that it will go into the other layers and bleach hair you don't want to.
As you apply the material to the layers, make sure to mash them in with your hand. Then apply the material to the hair layers surrounding the disk, and then start separating the remaining hair.
After you have finished applying the material to the first batch of layers, separate the other layers, put them between the previous ones on the disk, and then apply the material to them.
Applying the material to the sides of the hair layer will allow you to apply it to the hair layer closer to the roots. Then massage the hair layer a little and then apply the material to the rest of the hair layer the same way as before. For best results, apply the material between the hair layers, then massage the ends with your hand.
If you apply the material to the upper part of the hair layer, you cannot reapply it; however, you can reapply the material to the lower part of the hair layer using a blue bleaching powder and oxidant volume three to make the lower part of the hair look lighter. It totally depends on your individual preferences.
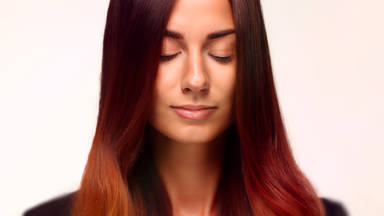
Start applying material again after you place the hair layers on the palette. You will see that the layers will not touch each other and even if they do, the pasty texture will prevent it from sticking. If you use this method, you can use different colored powders at the end of each layer. For example, the first part can be a dark red, the second part can be a lighter red or strawberry red, and so on. This will give the hair a beautiful multicolored appearance.
In order to highlight the right areas on the hair layer, the angle of the hand is crucial. Always keep your hands at a low angle, as if the layers are held at a high angle, there will be empty spaces between the strands and a bad highlight will result. If you want to apply the material to the side or bottom of the hair layer make sure to hold the layer at a zero degree angle.
The remaining hair on top of your head can be separated into layers, arranged in a V shape or triangle, applied with the material, and arranged on the empty parts of the disk afterward. Layers of hair should not be stacked on top of each other.
The hair disk tool allows you to perform a wide variety of fantasy highlights. The material can be applied higher or lower on the layers. Furthermore, the hair can be rinsed while the disk is still on the head and then color shampoos are applied to achieve a broader color spectrum.