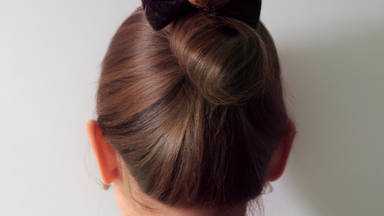
Stunning chignons are perfect for both formal and informal occasions. In this article, we will show you how to style your hair with a rose chignon and folding hairstyle. It's a hairstyle that will make you stand out wherever you go because it is graceful and sophisticated.
Let's start
To style the rose, first separate your hair into two parts and tie the top in a ponytail. From the side of the left ear to the side of the right ear, divide the remaining hair into two parts and tie one hairband at the top and another at the bottom.
The lower part of the hair layer can be styled with a hair iron to make forming the rose flower easier. You should first spread the hair layer across the top, find its center, and divide it into layers. The first rosebud should be formed using the current part. Try not to make the layers too thick. Take a small layer of hair and separate it from the rest.
Tease the layer you separated and hold the rest of the hair with a hair clip. In order to style it more easily without adding volume, you should tease the hair enough to form a bond in the layer. A small amount of styling spray can help reduce frizz at the front of the hair. You do not want to add volume to your hair, just to improve its style. Keep working on the layer you separated and tease it gently.
Using a net, cover your hair completely. Place the hair inside the net and tie the end of the net so it stays in place. Spray some styling spray on the hair at the borders of the net after straightening and styling it.
Adding volume
The hair should be folded gently. With your hands, twist the inside tip of the hair. The hair should be fixed to the top using a hairpin, then a layer of hair from the right should be separated. It is important that the remaining layers that you separate are a little thicker than the previous ones. Because you intend to add volume to the hair at this point, you should tease the second layer more than the first layer.
In the same way as before, you need to put the hair inside a net and tie the end of it. Then use the borders of the net to style the hair again. Spread your hair out and use some hairspray to style it. Make a rosebud out of your hair and twist it around it.
The next step is to work on the layer's edges. You can hold the hair up by using a small hairpin inside the hair net in the back of the layer. You need to divide another layer from the left side so you have a layer on the right and a layer on the left. I recommend starting with the left-hand layer.
Style the hair by teasing it and spraying it with styling spray. Make sure the hair is straight and place it in a net, and secure the ends of the hair net by a tie. The hair should be styled inside the net, and the edge of the hair should be broadened and positioned on the net border. It is fine to apply a small amount of styling spray if the hair needs it.
You should place the new layer of hair immediately underneath the previous one. You will get thinner hair as you work with the edges. You will be able to make the hair look more and more like rosebud edges as you work on the edges of the hair layer.
Elevating the layers of hair
Take another layer of hair from the right side and tease it. Similarly to what you did with the other layers, place the hair within a net and tie the end off. After you have styled your hair and widened it, you should hold one hair layer up at a time to elevate the flower you have created. The hair can be elevated by putting a hairpin underneath the hair layer. Once again, subsequent layers should be placed under the previous ones. As you style the hair layer, keep making it thinner at the edges.
Like before, another layer of hair should be added, teased, and then placed inside a net. However, as you intend to style the top of your head, this layer on top must be elevated more than previous layers. You will need to use the tips of the hair layer again, widening them and attaching them to the side of the rose with hairpins. Use a styling spray to give your hair a little extra shine.
The petals of the rose
Another rose petal can be formed using the bottom of the layer. Tease the next layer of hair. Put it inside a net. Use the tip of your hairpins to lift the layer higher. In this step, form the hair layer into a rounded shape by putting it inside a net and widening it.
The technique is adaptable, so you can use it to fold your layers also in other chignon styles. You can use this technique, for example, to fill the gaps between the petals of your flower. Use your hand instead of the brush to straighten the hair. You should hold the hair and tease deeply. Spritz the final layer of hair with a styling spray, hold it by hand, and blow-dry it.
Decorating the chignon's crown
Once the hair is styled, bend it into your hand and hold it from the center. You can then place the hair on the side of the flower you created. A hairpin can then be used to secure the hair in place.
After that, separate the next layer as before. Tease the layer thoroughly with your brush, but do not use it to straighten the surface. Usually you bend the hair from below, but you can also bend it from the side of the layer if it is long enough. You will need to place the hair inside the net again, widen the hair and place it along the border of the net. The hair can then be sprayed with a styling spray at the end to secure the final result.